The 6 Things Your Kitchen Must Have Done Before Cabinet Installation Day Philippines
Kitchen cabinet installation day is one of the most satisfying moments in a home renovation — but it can also be the day everything goes wrong if the site is not prepared correctly. This checklist covers the six items that must be complete before your cabinet maker's team arrives. Miss any one of them and you may be paying for a reschedule or, worse, for damaged cabinets.
Before we begin: Who is responsible for each item?
Items 1–6 are the homeowner's responsibility — not the cabinet maker's. Your cabinet maker is responsible for the cabinets. You are responsible for the installation environment. A reputable cabinet maker will tell you clearly what needs to be done before installation day. An unreliable one will arrive, discover items incomplete, and charge for the day anyway.
The 6-Item Pre-Installation Checklist
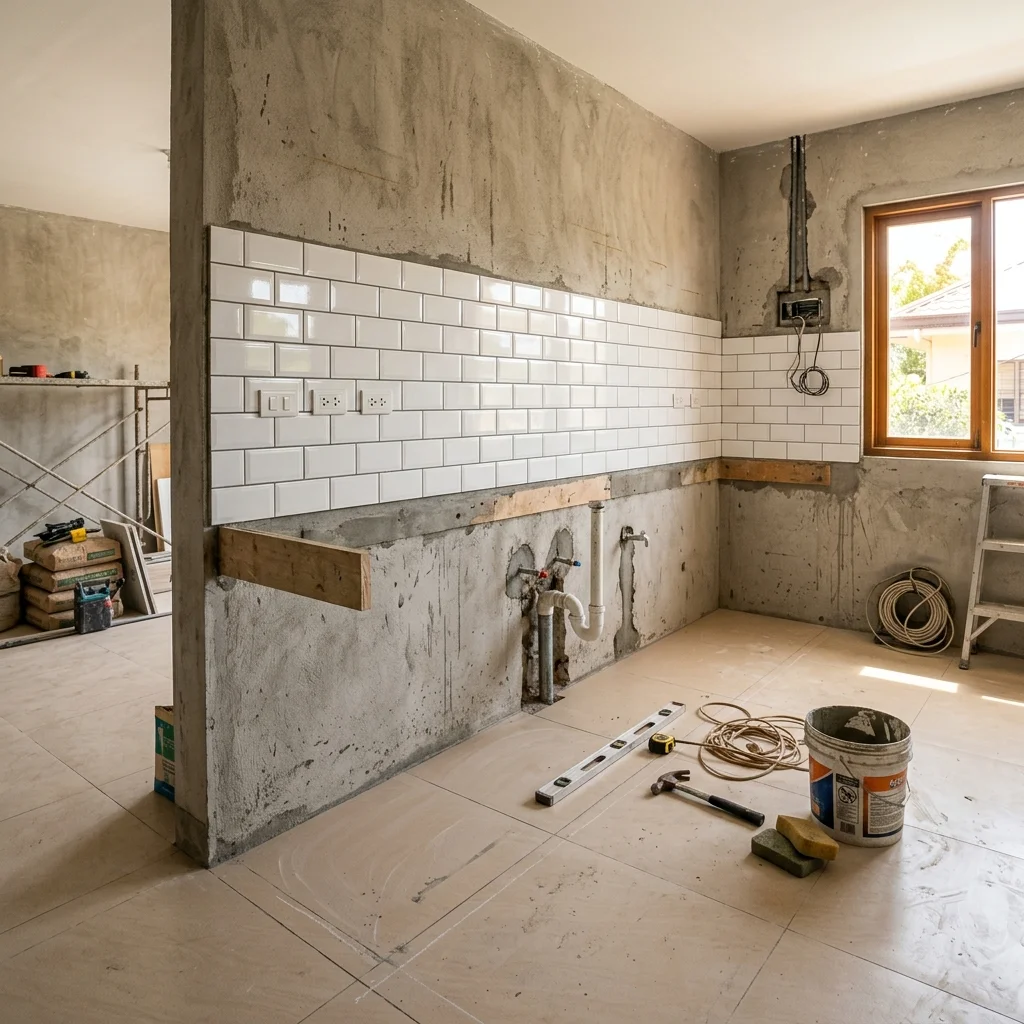
All Walls and Ceilings Painted — 100%
This is the most commonly missed item and the one that causes the most damage when ignored. All wall and ceiling painting must be completely finished before cabinets are installed. Once upper wall cabinets are hung, the wall behind them is unreachable for painting. Any attempt to paint walls after cabinet installation results in paint on the cabinet faces, door fronts, and hardware — this is not covered under any cabinet warranty and cannot be fully cleaned without damaging the laminate surface.
Crown molding and top molding can be painted after installation if needed — but all main wall and ceiling surfaces must be done first. Allow paint to dry for at least 24 hours before installation day to avoid wet paint transfer.
All Floor Tiles Fully Laid, Grouted, and Cured
All floor tiles must be 100% laid, fully grouted, and cured for at least 48 hours before installation day. Base cabinets sit directly on your finished floor. Cabinet heights are set relative to the finished floor surface — if tiles are missing, partially laid, or not yet grouted, base cabinet heights cannot be set correctly.
If your tiler arrives after the cabinets are installed, they cannot tile under or around the base cabinets without removing them first. This creates an impossible situation. The sequence is always: tile floor → install cabinets → tile backsplash (can be done after).
Note: floor tiles must be cured — fresh grout still needs 24–48 hours to set before you put heavy cabinet load on it.
All Electrical Outlets Positioned
All electrical outlets for kitchen appliances must be in position in the walls before cabinet installation. This includes:
· Range hood switch and power (typically above the range, at hood height)
· Microwave/oven power outlet (in the upper cabinet section behind where the appliance will sit)
· Refrigerator outlet (behind the ref space in the base cabinet section)
· Dishwasher outlet (under the sink base cabinet area)
· Counter appliance outlets (above the countertop line, in the backsplash area)
This is done by your licensed electrician — not by the cabinet maker. If outlets are not in position on installation day, cabinet backs will be drilled in the wrong positions or cannot be drilled at all without removing installed cabinets. Coordinate with your electrician at least one week before installation day. See our full installation process guide →
Plumbing Roughed In Under the Sink
The cold water supply line and drain line for the kitchen sink must be roughed into position under the sink area before cabinet installation. Your plumber positions the rough-in stub-outs so they emerge inside the sink base cabinet — not through the cabinet floor or sides after installation.
The sink base cabinet will be positioned during installation. If the stub-outs are not roughed in correctly, the plumber will need to core through the cabinet base or side panel after installation — which is difficult and looks unprofessional. The sequence is: plumber roughs in → cabinets installed around the rough-in → plumber returns to connect the sink and faucet after the countertop is laid.
Kitchen Area Completely Cleared
The kitchen and the full pathway from the building entrance to the kitchen must be completely clear of all furniture, materials, construction debris, and equipment on installation day. Our installation team arrives with full cabinet loads — every meter of clearance matters for delivery and maneuvering.
For condominium installations: elevator availability must be confirmed for your building. Some buildings require off-hours elevator booking for large item delivery. This is the homeowner's responsibility to arrange — coordinate with building management at least 5 days before installation day. We will notify you of the exact date and approximate delivery window one week in advance.
Building Access, Permits, and HOA Clearance Confirmed
For condominium installations: contractor passes, elevator booking, and any HOA installation permits must be obtained before installation day. Requirements vary by building — some BGC and Makati towers require contractor accreditation forms, proof of insurance, and 3–5 days advance notice to the property management office.
We provide all required contractor documentation (business registration, insurance certificates, contractor ID) on request. However, the homeowner must submit these documents to building management and obtain the permits — the cabinet maker's team cannot enter the building without them.
For house-and-lot projects: confirm there are no HOA rules restricting construction or delivery hours in your subdivision. Some subdivisions restrict heavy vehicle entry or noise-producing work to specific hours.
The Quick Summary Checklist
- ✅ All walls and ceilings painted — 24+ hours dry time
- ✅ All floor tiles laid, grouted, and cured 48+ hours
- ✅ All appliance electrical outlets roughed in position
- ✅ Sink cold water supply and drain roughed in
- ✅ Full clearance path from entrance to kitchen
- ✅ Building permits, contractor passes, elevator booked
Print this list and check each item at least one week before your installation date. If any item will not be ready, contact your cabinet maker immediately to reschedule — last-minute rescheduling may incur fees.
CabinetMakerPH sends you a pre-installation checklist via message 2 weeks before your installation date and confirms site readiness with a brief call 3 days before. You never have to track this alone. Full installation process guide →
FAQ
Installation Preparation FAQ
What must be done before kitchen cabinet installation in the Philippines?
6 items: (1) All walls and ceiling painted and dry; (2) All floor tiles fully laid, grouted, and cured 48+ hours; (3) Electrical outlets for all appliances roughed in; (4) Plumbing roughed in under the sink; (5) Kitchen and access path completely cleared; (6) Building permits, contractor passes, and elevator access confirmed. Any incomplete item on installation day may require rescheduling.
Should cabinets be installed before or after floor tiles in the Philippines?
Always tile the floor first. Base cabinet heights are set relative to the finished floor surface. If tiles are not installed, the cabinet heights cannot be set correctly. The correct sequence: rough plumbing → rough electrical → floor tiles → cabinet installation → backsplash tiles → countertop → sink and faucet connection.
Should walls be painted before or after cabinet installation?
Always paint walls before cabinet installation. Once upper wall cabinets are installed, the wall behind them is unreachable. Painting after installation will get paint on the cabinet faces, doors, and hardware. Crown molding can be painted after installation if needed, but all main wall surfaces must be complete first.
Related Guides